 |
|
Pepper_2003112000 Simian Volume Renderings
 |
 |
 |
|
||
  |
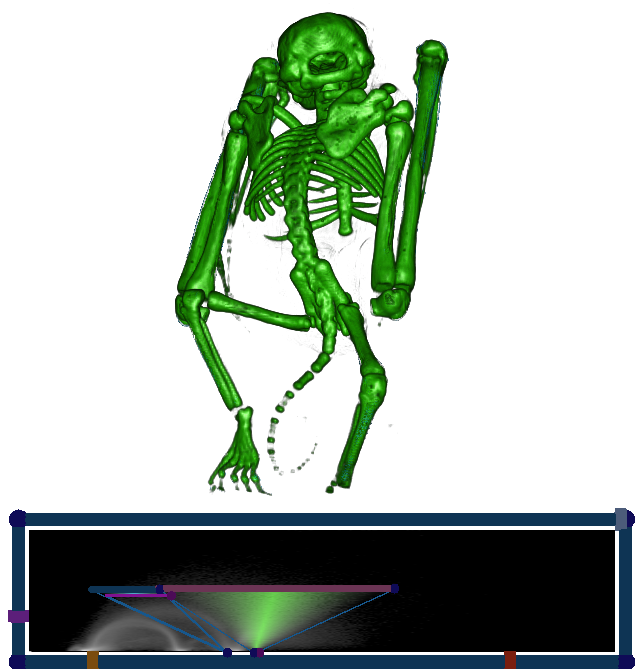
The image to the left was obtained using two 1D classification widgets, but you can make a good rendering of the bone using the triangle widgets. The default classification widget is triangular. You can change it by holding shift and clicking on it several times until you get to the 1D widget. There are a total of four classification widgets (in order) - triangle, elliptical, 1D, and default. To return to the triangle, keep holding shift while clicking on the widget until you return to the type of widget that you need. You may change the expressiveness of the widget by clicking and dragging the dot that appears in the middle. Once you got the skeleton to appear you will probably have to do some fine-tuning to make sure you have all the bone and only the bone appearing. If you are planning to display the organs of the bat in addition to the bones, it is always a good idea to define the skeletal structure before you do the organs so that you will be better oriented as to where each organ is supposed to appear. Unfortunately in this case, segmenting the organs from the rest of the body is impossible because they have not been dyed. When organs are dyed, they infuse a heavier (more dense) substance like iodine, thereby giving the organs a different density from the rest of the homogenous flesh. Also a good guideline is to make the skeleton a darker color than the rest of the animal and keep it at full opacity. If you want to give the bones a more natural look, you may want to set the background black and then change the color of the bones to white. You may change the background color by pressing 'm' and choosing the black background in the menu that appears. To change the color of the bone, click and hold on the classification widget and drag the mouse up until the bone looks reasonably white. When working with Simian, it's much easier on the eyes when you give your volume rendering a 3D look by appling shading to it. The menu has shading options or you can simply press F10. Renderings almost always look much better when shading is applied so you might as well do it in the early stages of editing rather than at the very end. Here is an example of the shading effect: before and after. In this example, nothing but the shading has been changed. After you apply shading you may have to adjust the expressiveness of the widget or change the brightness of the color to make the image look better. | |
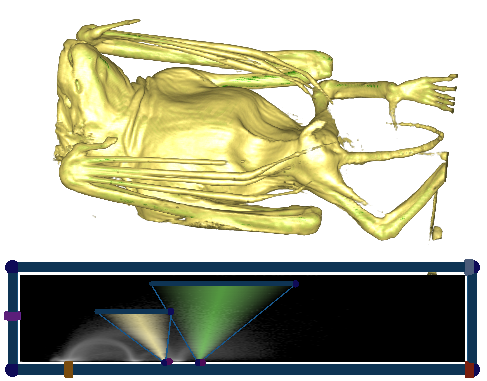 |
On the histogram, the skin is located just to the left of the bone. Isolating the skin is a bit trickier than the bone because it's wedged in there between the jar and the flesh. If you're not careful, you might include some of the guts or pieces of the jar in your classification widget for the skin. When you are satisfied with your result, rotate the bat around and make sure you have included all the skin. That means that no bone should be showing. If you're having trouble with isolating the skin, you may emulate the transfer function that is at the bottom of the image to the left. | |
Using the Clipping Plane |
||

| ||
| Oftentimes, you may want to be able to see the insides of your object, but the outer features are interfering with the view. In this case, the clipping plane is a useful tool to use. It allows you to make cross sections. With Simian, you may control the axis and depth of the cross section. In the sequence of images above, the X-positive clipping plane is used. You may select it from the menu after expanding the clipping plane options. After selecting a clipping plane, you may move it around by clicking on the frame that appears and dragging it. That is useful if you want to move it out of the way when taking screen shots of your rendering. When selecting a clipping plane, don't be alarmed if your dataset disappears altogether. All you have to do is adjust the plane by right clicking on its frame and moving your mouse down. This will move the clipping plane away from the object, thereby making it appear again. To cut deeper into your object right click and move your mouse upward. | ||
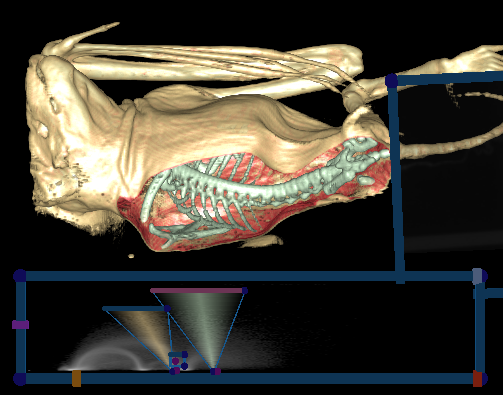 |
Suppose you want to distinguish the inside of the skin from the outside layer like in the image to the left. You would have to use a clipping plane as you create another classification widget. In this example, a small elliptical widget was used and given a red color representing blood vessels and the bone was colored light grey for a more realistic feel. The widget needs to be small enough to not include the rest of the bat's fleshy interior. | |
